
Not many people know about the Quick Access toolbar. We all have one and it’s an ACE tool for saving you time and effort when it comes to using Excel, but for so many people it remains a mystery!
The Quick Access Toolbar in Microsoft Excel is a customisable toolbar located at the top of the Excel window, designed to provide you with quick access to your frequently used commands.
It serves as a shortcut hub, allowing you to streamline your workflow by placing essential tools and functions just a click away.
By default you’ll usually have the following items in your Quick Access toolbar:
But you can also add your own items to this toolbar to help speed up your work and give you quick access to tools that you use on a regular basis.
This is ACE because it saves you from having to go through each Ribbon to find them each time – they’re always available to you at the top of your screen.
For example, I have ‘Print Preview and Print’ on my Quick Access toolbar. So, instead of having to go into File > Print every time I want to use this, I can just find and access it with one click of the icon.
Customising your Quick Access toolbar is super simple. All you have to do is go to the far right of the toolbar and find the little arrow that says ‘Customize Quick Access Toolbar’ when you hover over it.
![]()
When you click on this icon, Excel will give you a list of some of the most commonly used Quick Access tools.
If the tool you’re after is in this list – ACE. Just select it and it will be added to your toolbar. You can easily see which are already added to your toolbar thanks to the little ticks that appear next to active tools.
BONUS TIP: If you want to remove tools at any time you can just untick them from this same list.
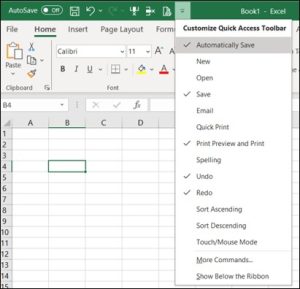
If you want to add an icon to your toolbar that isn’t in this suggested list, head to the bottom and click on ‘More Commands…’
This will open a new menu window for you with all of the commands that are available to add to your Quick Access toolbar.
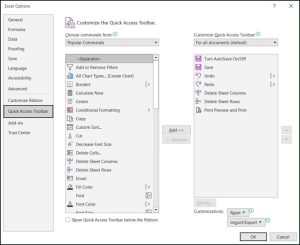
You’ll initially be presented with a list to choose from popular commands.
The window is divided into two halves:
To add a new item to the toolbar, select it from the list of commands on the left, then click ‘Add >>’ in the middle of the screen and you’ll see the command is added to your list of chosen commands on the right. Alternatively, you can also just double-click on the item in the list on the left.
At the far right of the window, you’ll find two arrows (up and down) that you can use to adjust the positioning of the items you’ve added to your toolbar and decide the order they appear in.
Once you’re happy with your selection, click ‘OK’ in the bottom right of the window, and you’ll see your updated toolbar at the top of the screen.
BONUS TIP: You can display your Quick Access toolbar either above or below your ribbon. By default, it will appear above, but if you want it below, click back into the ‘Customize Quick Access Toolbar’ menu, head straight to the bottom and select ‘Show Below The Ribbon’.
You’re not restricted to just ‘Popular Commands’ when customising your Quick Access toolbar.
If you head back into the ‘More Commands…’ window and click the dropdown icon alongside ‘Popular Commands’ you’ll see that you can actually choose to add tools from any tab of the ribbon!
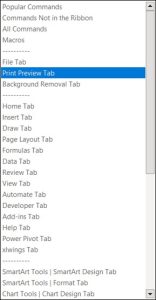
This gives you every available icon that can be added to the toolbar.
If you know that a particular command lives under a specific tab in the ribbon as well (if you’re using it frequently enough to want it to be added to the toolbar, then you most likely do) you can head straight to the tab from the dropdown list and this will automatically update the left-hand side of the window to show you all of the available commands from that tab.
But wait, there’s more!
You can also access ‘Commands Not in the Ribbon’ which is ACE! Select this option and browse through all of the non-ribbon commands, adding any you’ll find useful to have on your toolbar.
There are two other helpful customisation options that you can find in the ‘More Commands…’ window.
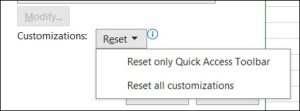
Underneath your chosen commands you’ll find a button that says ‘Reset’. This is handy to use if you’ve gone a bit wild with adding commands to your toolbar and want to start afresh.
You can either choose to ‘Reset only Quick Access Toolbar’ or ‘Reset all customizations’.
The other helpful customisation option sits just under ‘Reset’ and is the ‘Import/Export’ option.
This function allows you to export someone else’s Quick Access toolbar and import it into your own version of Excel (or vice versa).
So if you’re a bit jealous of the way your colleague has their set up, you can just pinch it from them without having to go through the hassle of setting the whole thing up and selecting commands yourself.
The Quick Access toolbar is an absolute time saver. If there’s a function that you’re constantly searching for, add it to your toolbar and you’ll suddenly find that you’re able to get to it without any hassle.
My advice would be that the fewer icons you have in your toolbar the better to make sure they remain ‘quick access’. (I once had a colleague who had three rows worth of tools which meant that they still had to search for things even though they were in the toolbar!)
So keep it to a minimum for maximum efficiency and regularly review your toolbar to make sure your chosen commands are ones you actually use often – otherwise, enjoy using this ACE tool that will most definitely save you time and effort when using Excel.

